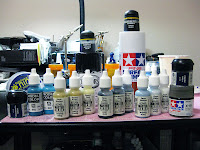
 I have finally -- finally! -- gathered all the paints needed for my next project. It took a lot longer than I expected it to, because I had some issues getting a couple of colors right -- mainly, the different shades of turquoise for the base and highlight. Then I needed to find a complementary color range to use for things like cloaks and banners (more on how I did that a little later in this post).
Anyway, once the colors were decided and then matched to a real-world equivalent, it became my quest to actually find all the ones I didn't have locally and buy them. I have this thing about buying things locally -- if there's a business in town that carries what I need I'll go there and buy it. Now what with me being a network engineer (well, ok that was my title, before my promotion) that I would be all up in the whole Internet shopping. For most things, you'd be right, but when it comes to hobby-related things, I keep my money in Austin...it's just a thing I do.
Anyway, it took a little time and a little driving about town but I finally got everything I needed and thought I'd share this little portrait of me next project's palette. :)
Now...can any of you guess what my next project is based simply on the colors in the palette? (And no fair telling, fellow Austinites!) I have a feeling some of you just might be able to get it right...
Now let me tell you about a couple of nifty little resources I discovered in my quest to match paint colors to colors in a digital image:
Let's say you have a digital picture or document that has colors you want to match. If you've had artistic training you can probably do it without thinking about it too much. Well...I don't, so...technology to the rescue!
First thing I opened the image in Photoshop CS4. There's a tool in Photoshop that lets you "sample" a color and it will return the "values" of the color in several formats, including RGB "hex" color codes used in web pages. I took a few random samples of the color and then proceeded over to Color Match v1.0. If you've never used this site before...I highly suggest you check it out. You feed it a color -- either one from the extensive list of paint ranges that's available, or by RGB hex value. I fed it the value I'd gotten from Photoshop, unrestricted the paint ranges it would choose from, hit the button and 2 seconds later I"m looking at a graphic of my chosen color surrounded by the six closest matches from it's dat abase (and like I said, it's pretty extensive). After that I used a couple of other sites (that, I just realized, are on my other laptop so I don't have the links for them...let me know if you want them and I'll pop them up later). that will take a color (again, by RGB hex value) and present you with the complementary, contrast, split complement and "box" colors of your color from the color wheel. I think it's pretty bad ass.
Finally, I took the hex values from the color "theme" generating sites and put them back into Color Match and badda bing, badda boom I had the info on the colors I needed.
So there you have it: a portrait of the palette and how I got the paints matched to colors in a digital image.
How about you guys? How do you choose your color schemes? Ever use one of those nifty color wheel thingies? How did things turn out?
 Holy crap, it seems just like yesterday I was talking about putting up some sample pics that resulted from taking some test pics with the light-box. But it wasn't "only yesterday", come tomorrow it will have been a week since that post -- which means, ultimately, is that I should have been able to smell the FAIL in that idea. :)
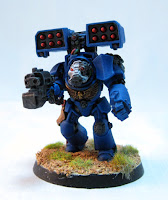
Fast-forward through this craptacular week until last night. I was finally had the time to pull it all together and take a few pics with the new gear. Adding new gear into your photo-making world is pretty much like adding a new brush into your painting tools. Sometimes making only a change or two can have fairly dramatic (and sometimes unforeseen) consequences and will take time for you to learn how to use the new tools and smoothly integrate it into your processes. It can also reveal deficiencies in your existing gear, too -- I realized almost immediately that I don't have enough "proper" light sources to use the box most effectively. These photos have fourescent, CFL, and incandescent light sources...and that's probably the worst mix of light temperatures to attempt capturing the subject's color accurately. Don't get me wrong, I knew this going IN to this little "photo shoot" but I made the best with what I had on hand. Needless to say, a trip to Lowe's is in order to purchase more "shop lights" and "daylight" CFL bulbs before I try to take any more pics.
 Luckily, it's Pho
 toshop to the rescue (as it often is when you're dealing with digital images). If you're unfamiliar with digital image manipulation software, there's a halfway-decent tutorial on CMON that covers the very basic basics. And if you don't have Photoshop (and it's an expensive beast, I'll grant you that), well that's OK, you can always use The GIMP. It's free, open-source software that works, and works very well (having most of the core functionality of Photoshop).
Like most things, though, do a little research and a little reading and you'll quickly learn how to "clean up" your images with minimal effort.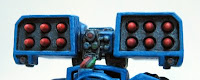 Also keep in mind that I did VERY little image manipulation on these pics, spending only a couple of minutes on each one. So while they look pretty good...they could look a lot better if I wanted to spend the time to do it -- but for my purposes at this point, I think they're acceptable.
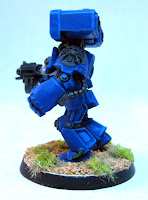
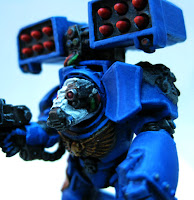 Another trick I need to learn is improving the "detail" shots -- you know, when you want to highlight a specific detail or two on the mini. Planning the shots out before (or while) you've got the camera on the tripod will really pay off. One thing's for certain, you're probably not going to get that nice "money shot" of those details if you didn't take some good pics of them in the first place. :)
Now if only the Blogger editor could handle image placement in blog postings, we'd be in business. But for some reason, it doesn't, and by that I mean, "Yes, it does, but BOY does it SUCK." If anyone has any tips or knows of a way to place images in blog postings using a WYSIWYG editor, please let me know, because the stock editor is FAIL.
Oh, and before you even suggest it: No, I'm really not interested in cranking out some custom HTML code to make pictures display exactly where I want them to. C'mon guys, it can't be THAT had. I'm pretty sure both Microsoft Office and Sun's OpenOffice have word processors that'll do it...get with the program, Google, and suck less! :)
 Anyway, enough about that. I mean it's not like you can't place images in the posting at all (obvioiusly, huh?).
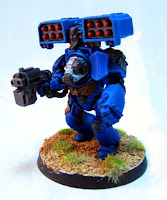
This final image is the one I'm most happy with (or should that be, "least disappointed in"?). I did a tiny bit more image manipulation on it (though the background -- at least in the image presented to me in the Blogger editor -- looks kinda like ass and could definitely use some tidying up.
Ah well, that's a project for some other time. :)
So what do you use for taking pics of your minis? Any specific gear? What about where you take those pics? Indoors? Outdoors? In your secret underground lair? What about touching those pics up before posting them? Any specific steps or procedures you'd like to share?
 I have finally -- finally! -- gathered all the paints needed for my next project. It took a lot longer than I expected it to, because I had some issues getting a couple of colors right -- mainly, the different shades of turquoise for the base and highlight. Then I needed to find a complementary color range to use for things like cloaks and banners (more on how I did that a little later in this post).


